 RGB.jpg)
Welcome to my blog! I thought that I would try my hand at writing about various aspects of mandolin making on a more or less monthly basis. I say 'more or less' because new submissions will largely be based on wether or not, I have the time and inspiration. New entries will be posted here with the latest one at the top so you can quickly see if there has been any activity since your last visit.
Wow! I can't beleive that I'm into my third year of blogging here! In order to keep things from becoming too unruly, I will begin seperating each year of blogs onto its own page. Just click on the links below in order to read my past postings.
September 21, 2018
Recently, I made a switch in my standard option for fingerboard profiles. For years I have used a radius of 7.25" as my standard fingerboard profile and it has worked very well. In my constant and relentless pursuit to create only the very best, I have decided that a conical radius, as opposed to a constant radius, is technically superior although admittedly by a small degree. While most manufactures are looking for ways to cut costs, I am always looking for ways to make improvements. This can take the form of a new jig or process to increase productivity but I never sacrifice quality for the sake of expedience. Often times, when I design a new jig or fixture, it simultaneously increases quality and efficiency but any new tooling must, at the very least, maintain my high standard for excellence.
In the case of going to a conical fingerboard profile, it is a small improvement that actually takes me more time to produce but as I have mentioned, it is technically more correct and so I feel that I need to incorporate it into my mandolins. To explain why it is more correct, I have made a few illustrations to demonstrate the difference between a conical profile and a constant radius, which can be described as a cylindrical profile. Before I do, I would like to air a little pet peeve of mine.
I would guess that fewer people reading this have heard of a conical profile than have heard the term "compound radius". Now I'm no mathematician but this term has always bothered me since the first time that I heard it back in the 80s. It just has the ring of a made up term to describe the existing, more accurate term, 'conical'. On doing some research, you will find that in no other field of endeavor, save for fretted instruments, is the term compound radius in use. A radius that is constantly changing in a linear fashion is always conical or in some applications, the term tapered is used. Now I have read some articles that claim that a "compound" radius is different than a conical profile. The claim is that a compound radius does not change in a linear fashion but rather has different radii at various locations of the fingerboard. That simply could not be made to work for a variety of reasons most notably the fact that a string, held in tension, always forms a straight line and so the fingerboard surface too, must be straight.
Anyway, I wish that were enough of that but unfortunately, I must contend with a couple of generations who have been taught to say "compound radius" when what they mean is conical.
For those of you not versed in the intricacies of radius-ed fingerboards, let me offer what I hope is a simple explanation.
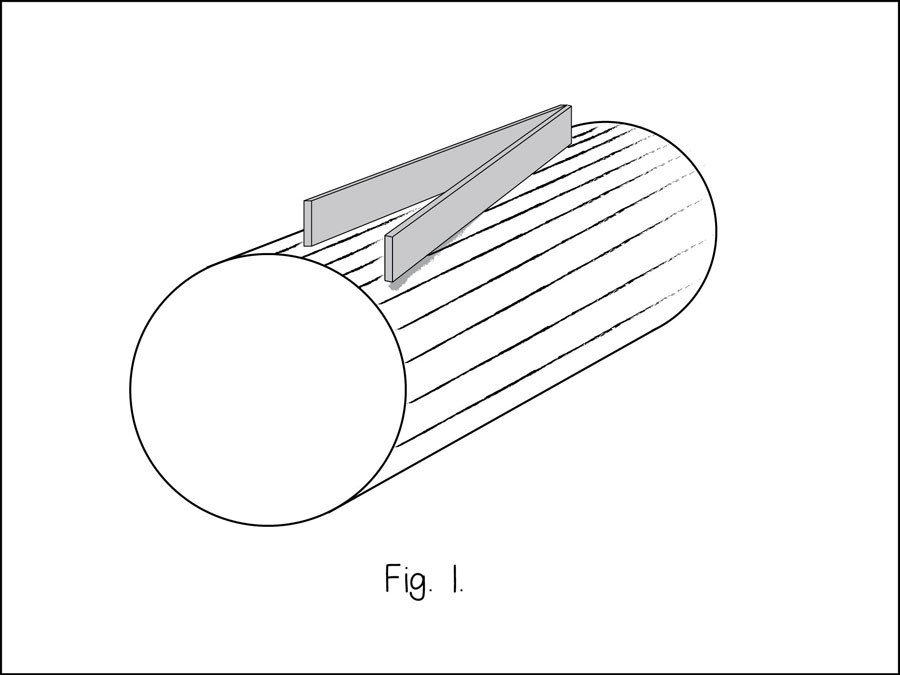
In fig. 1., we see a cylinder with two straight edges placed on it. One of these runs parallel to the axis of the cylinder and the other is somewhat skewed off axis. The straight edges can represent a typically tapered fingerboard and the cylinder the radius of the fretboard. You will notice that the off axis straight edge loses contact with the cylinder as the cylinder's surface drops off in a curved line. This is why a constant radius on a fingerboard that tapers in width, does not give the best possible playing action all along its length. The action gets unnecessarily higher as we go down the fretboard.
To be clear, fig. 1. is an exaggeration to illustrate the point. In reality, my fingerboards have a taper of only 1.3° and so this effect is minimal, but it is real.
.
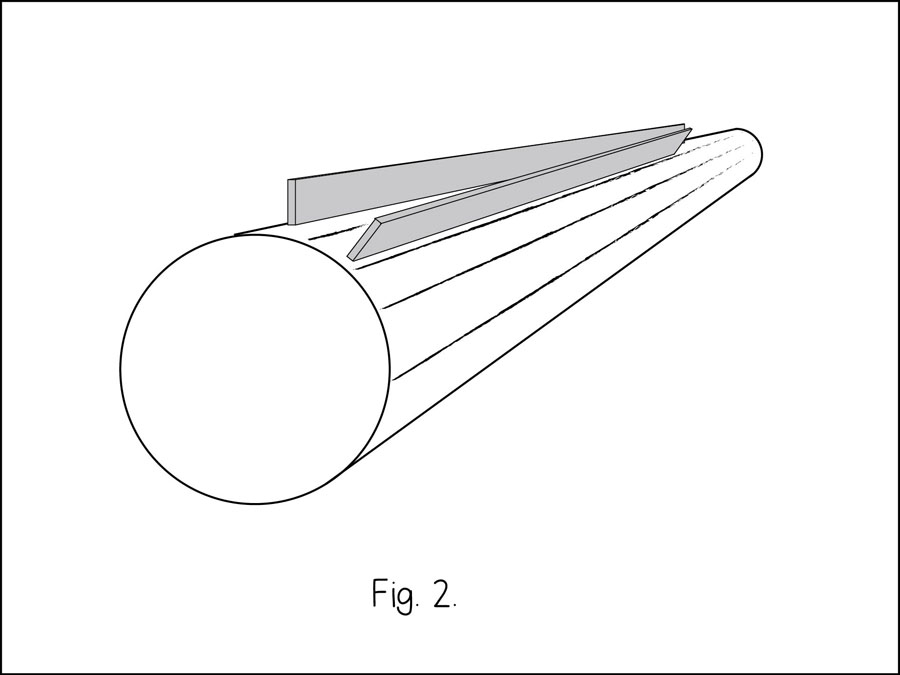
In fig. 2. we see the straight edges resting on a conical shaped object. Here the two skewed straight edges, representing the strings, stay in contact with the surface of the cone. With a configuration like this, the action can be set to its lowest possible setting and remain as low as possible along the entire length of the fretboard.
.
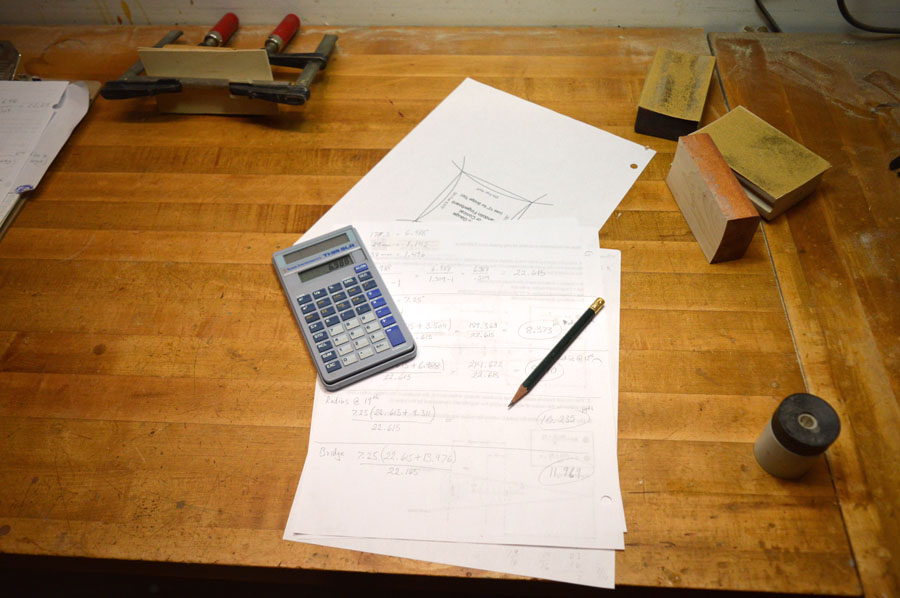
Now, not just any arbitrary cone will work. The dimensions of the cone or put in another way, the rate of the changing radius must coincide with the amount of fingerboard taper in order to yield straight lines in the axis of the strings. Using formulas that are readily available to anyone with a computer, I was able to come up with the matching conical profile for my fingerboard taper. I knew that I wanted a 7.25" radius at the nut and so I wanted to know what the radius should be, for my fingerboards, at the 5th, 12th and 19th fret as well as the proper amount of arch for the bridge top. It turns out that the amount of arch at the bridge for my fingerboards, given a 7.25" radius at the nut, is very close to a 12" radius.
.
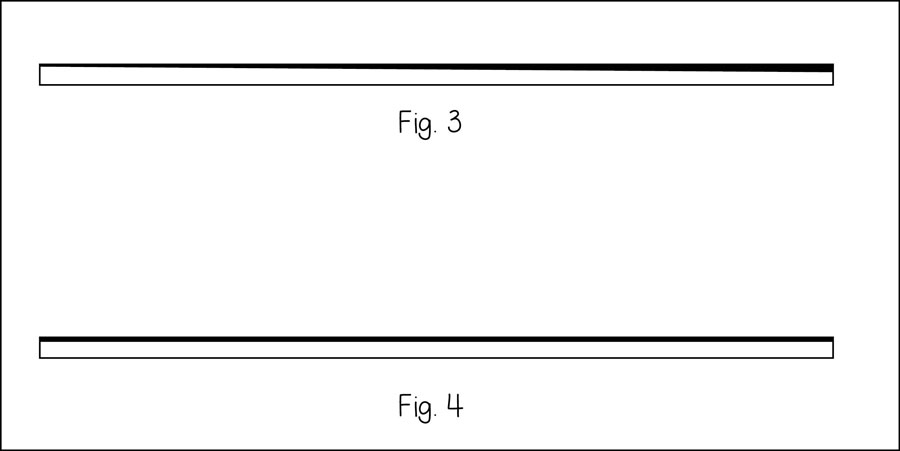
Another benefit to a proper conical fretboard profile is a visual one. On a fingerboard with a steady radius, the side edge will appear to taper down towards the bridge. This is because, as the fingerboard becomes wider, it moves further out on the radius and therefore becomes thinner at the edge. With a well matched conical profile, the edge of the fingerboard will remain perfectly parallel its entire length. (see side views fig. 3. constant radius and fig. 4. conical radius)
.
Creating a conical verses a cylindrical fingerboard profile requires more time and skill than the latter and even though, given the small amount of taper on my fingerboards, it is only a marginal improvement, I feel that it is technically correct and therefore have incorporated it into my build process. I am totally committed to building only the highest quality instrument possible.
Until next time, thanks for reading,
Oliver
.
.
.
.
.
August 4, 2018
Last week Jody and I took a week long trip to combine a little business and pleasure. I wanted to go to Nashville to accomplish a number of goals and so we thought that we would take the opportunity to also get in a little motorcycle riding in some of the best riding areas anywhere in North America. The Blue Ridge Mountains offer fantastic scenery with well paved twisties and sweepers. (that's motorcycle lingo)
One road in particular has been on my bucket list for a long time. It's called "The Tail of the Dragon" and is a Mecca for motorcyclists from all over the world. Located near the North Carolina/Tennessee border, it is an eleven mile stretch with, count 'em, 318 curves! It was such a blast to "slay the Dragon" and get some patches to add to my vest. Below is a photo of me on my trusty customized 1984 Kawasaki ZN1100 LTD somewhere along the Dragon's tail. (click photo for video)
Another famous road that I have wanted to ride for a long time is the Blue Ridge Parkway. It is 469 miles long in total and runs mostly along the "spine" of the Blue Ridge mountain chain that is part of the Appalachian Mountains. An incredibly scenic road and to my pleasant surprise, cool and shady most of the time. We rode about 75 miles, stopping in Little Switzerland for a Reuben sandwich and a cold beer before retracing the route back to Asheville. (see photos below)
After two days in the Asheville, North Carolina area, it was off to Nashville for some mandolin related activities. The first stop was a Saturday afternoon "meet and greet" over at Carter Vintage Guitars, perhaps the most venerated fretted instrument shop in the world! Although I had been a fellow speaker/panelist with Walter Carter at a guitar making symposium in Fayetteville Pennsylvania back in the mid 80's, I had never actually met him in person. Walter is without a doubt, one of the most knowledgeable people on the history of American fretted instruments in the world today. He and wife, Christie Carter now own and run Carter Vintage Guitars. I had shipped a brand new Rosine model mandolin along with a box of t-shirts to Carter's which arrived a few days ahead of Jody and I. We met with many customers, giving out t-shirts to any that uttered the code phrase "I don't want a pickel" and a few others that were just big mandolin fans. (There may be a few shirts left so if you are in the area, walk up to Walter and say, "Oliver sent me and I don't want a pickel" and you may get yourself one.) Forrest O'Connor stopped by for a time and invited Jody and I to his and wife Kate Lee's house for a little visit before their big show at the Ryman Auditorium on Sunday night. Walter and Christie Carter could not have been nicer hosts. It was truly a pleasure to meet the two of them. I only wish I had more time to talk mandolins with Walter. On Christie's advise, we went to an establishment called "Peg Leg Porkers" for some authentic Tennessee Barbecue. Their motto, as we found out, is, "In Tennessee barbecue is all pork. If you want brisket, go to Texas!"
Below is a photo of myself with Walter Carter and Forrest O'Connor. (By the way, that Rosine Forrest is holding was snapped up before we got back home!
Later that Saturday evening, it was off to the iconic bluegrass venue The Station Inn where we were fortunate enough to catch a show by the legendary Roland White and his band. I've been a fan of Roland since first seeing him play live at Barton's Inn in New Dundee, Ontario with The Country Gazette in the late 70s. I had not seen him since our last encounter at an IBMA show in Owensboro, KY back in '92. It was so great to see him again.
Sunday night found us at The Ryman Auditorium to see The Mark O'Connor Band. Besides Mark O'Connor, the band is largely made up of the O'Connor family including Mark's wife Maggie O'Connor, Mark's son Forrest and Forrest's wife, Kate Lee with flat-pick guitar champion, Joe Smart and bassist/old time banjoist Geoff Saunders. Basically, a super-group. What an incredible show they put on! They garnered no less than 4 standing ovations from the extremely, enthusiastic crowd. One of those ovations came mid-show after a mandolin show-down between Mark and Forrest. As Forrest introduced the number, he told the audience that the maker of his mandolin was in attendance and finished with "Oliver, this one's for you!" Let me tell you, this is the kind of thing that makes all the dedication and hours of hard work all worthwhile!
.
The above photo of my wife Jody and I was taken by some fine folks who happened to be seated next to us at The Ryman, Wanda and Terry Everett. All the other photos, except me riding the Dragon were taken by Jody.
Well, on our last day of an incredible trip, we had a southern brunch with Forrest O'Connor that consisted of country ham, hash brown potatoes and grits. Grits were a first for both Jody and I and I have to say, they are much better than they sound. They are basically a porridge made of milled corn and do not have a lot of flavor on their own. They do have a nice smooth texture and can be flavored with a variety of things. We had ours with some melted cheese. Good eatin'!
Until next time, thanks for reading,
Oliver
.
.
.
July 4, 2018
I find it somewhat fitting that I am able, for the first time, to announce my newest endorser, Forrest O'Connor on the 4th of July as I consider the O'Connor family to be American music royalty.
The story on how Forrest O'Connor came to endorse my mandolins has it's beginnings as far back as 2013 I believe. At that time I was temporarily out of business when I got an email from Forrest asking for information regarding a specific mandolin of mine that had come up for sale at Carter Vintage Guitars in Nashville, TN. That deal did not go through and I kind of put it out of my mind as I didn't expect to be back in business any time soon. As it happened, in 2014 I came into a little unexpected money. It was enough to build a new shop on my property and re-start the dormant "Apitius Mandolin Company"
After about a year of re-tooling and building the first few of the second generation Apitius mandolins (Apitius 2.0) I had remembered that email from Forrest. I knew that he had at least some interest in my mandolins so I thought why not contact him and tell him that I am back in business. Forrest seemed very keen to try one of my new models but he was adamant that he would not have a mandolin built on spec. He was very particular he explained and would need to try any instrument before making a commitment. I totally understand this position. The trouble was, I had a significant backlog of orders and I didn't know when if ever I would have a mandolin available to take for a test run before deciding whether it was the mandolin for him.
Of course this was very frustrating for me as I had grown up a contemporary of Forrest's father, the legendary Mark O'Connor. I still remember vividly that day in 1979 when a music store owning friend of mine took me for a ride in his newly acquired Corvette Stingray. I was very impressed with that car until he popped in a cassette tape of the newly released "Markology" album by a younger than me by two years, Mark O'Connor. The instant the first notes of "Dixie Breakdown" started playing, all interest in the 'Vette' vanished and I was absolutely transfixed! That young man had just raised the bar by several significant notches and it was to be just the beginning!
To be honest, I did not realize that Mark O'Connor had a son until I received that fateful email. Turns out, Forrest seems to have hit the genetic lottery! Not only is he an absolutely brilliant musician but among his other accomplishments, he graduated from Harvard (yes that Harvard) summa cum laude. Best of all, through all of his God given talents and ability to work hard, he has managed to stay down to earth and is a pleasure to associate with, but how to get him an Apitius mandolin to take for a test drive?
As fate would have it, Forrest and I were both going to be in attendance at the 2017 IBMA yearly extravaganza. I would be bringing two mandolins, unfortunately, they were both already spoken for. (one by "Tyminski") At least it would be a chance for Forrest to try one out and hopefully, for me, keep his interest strong. We made plans for Forrest and his wife and musical partner, Kate Lee to meet with my wife Jody and myself in the lobby of the main IBMA venue. Forrest brought the mandolin that he was currently using and I brought "The Tyminski". After exchanging pleasantries, Forrest got to work A-B-ing the two mandos. The large hall had better than expected acoustics with a nice amount of reverb. As Forrest changed from one mandolin to the other, I was thinking to myself that I liked the way the Apitius was sounding. I refrained from saying so as my opinion didn't matter here, it was what Forrest thought of course but he was giving nothing away. Then, as though she needed to break the tension, Kate exclaimed, "That Apitius is kicking that other mandolin's butt!" I certainly felt the release of anticipation, especially when I saw a nod of agreement coming from Forrest. Great!, but that still does not solve my problem as that mandolin was not up for grabs.
Then an idea hit! I proposed a plan to Forrest where I would reserve a place on my waiting list and would build a mandolin to his specifications on which he would get "first right of refusal". That way he did not have to commit to the mandolin before getting to try it out and if it was not to his liking, I told him that I would just put it up for sale. No harm done.
Well, a long year went by with many email exchanges until finally the time came to ship the finished mandolin to Forrest's home in Nashville TN. Now Kate and Forrest are very busy and in demand people and would not be at home to accept the package. A plan was devised where I would ship the mandolin c/o his building manager's office. What could go wrong? I monitored the tracking feed several times daily and was relieved, at first, when the tracking feed said "delivered". There was a little button on the tracking page that said "proof of delivery". Of course I hit that and up came a time and date with the note, "left at front door". LEFT AT FRONT DOOR! Where was the required signature?! I started to feel very anxious and uneasy when I summoned up my Buddhist practice and calmed myself down. It is what it is, I told myself. Getting anxious will not help. It's probably fine and if it is not, it is what is.
I asked Jody to text Forrest and see if he could confirm a safe and sound delivery. To my horror, the package was unaccounted for and MIA! "Oh my God!" "It is what it is." "Oh my God!" "It is what it is." my schizophrenic brain kept saying. Both of us, Forrest and I, were on the phone with the delivery company. I got nowhere. Then finally, a few hours later, we got word from Forrest that the mandolin had been located safe and sound. Wow. What a relief! Forrest didn't have time to explain further as he was busy giving a send off to the Dean of Harvard University who was retiring after an illustrious career. I am assured that all will be explained over dinner in Nashville at the end of the month.
Sooooo..... What did Forrest think of the mandolin after all that? Well let me share a couple of email quotes that he sent me.
.
"Hey Oliver,
I finally got to play the mandolin after returning to Nashville this evening -- wow!! What a fantastic instrument! It's making me not want to pick up my #### anymore haha..."
.
"Hey Oliver,
I got to spend more time with the mandolin yesterday, and I have to say -- this is a magical instrument! I absolutely love the mandolin. I haven't had an instrument inspire me to just sit around and play for a pretty long time, and this one does just that. I was playing along with some recordings in my home studio -- I had my speakers blaring, and somehow I could still hear my own playing. I can't believe how much the mandolin can be driven. And yet it has the sustain of a softer, sweeter wood that opens up so many other musical possibilities.
So, in short, I am definitely keeping it!!"
.
I needn't tell you how thrilled and gratified I am to hear those words. It is the best part of what I do for a living. To hear that a client is truly happy with what I have created for them is what it's all about and even more so when it is the opinion of someone who's on such a high level. I am truly blessed to have a roster of such high quality clients and endorsers.
Let me leave you with some photos and links to a couple of Forrest's projects.
.
.
Here's an example of the Mark O'Connor Band in action.
(the video was shot before Forrest owned an Apitius mandolin)
.
Oh, and bye the way, Jody and I are planning a trip to Nashville the last week of July. We plan to be at Carter Vintage Guitars somewhere around 2 until 5pm on Saturday the 28th. If any of you are going to be in the area, we'ld love to see you and say hello.
As always, thanks for reading,
Oliver
.
.
.
June 12, 2018
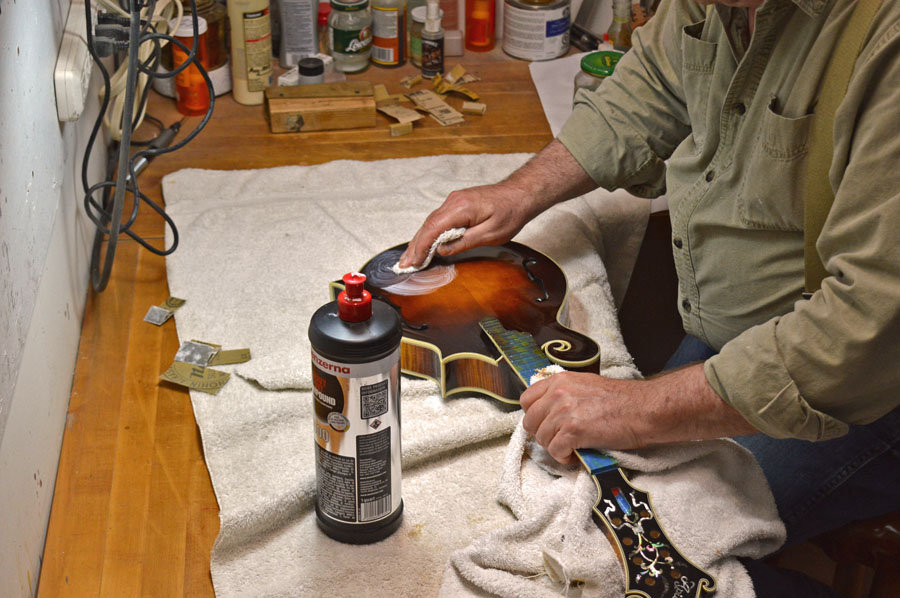
While French polishing creates a fairly high gloss on it's own, it usually needs some buffing and polishing to look it's ultimate best. The spirit varnish finish on my mandolins is so thin that machine polishing would be too aggressive. The risk of burning through the finish is just too great. So, after the varnish has been hand applied using the French polish method, I hand polish the finish using a soft cloth with some polishing compound added.
Although my finishes have the appearance of great depth, they are actually very thin. Basically, in French polishing, vapor thin layers, which fuse together to form a singular film, are slowly built up until the film is just thick enough to produce a smooth gloss. The warm, yet crystal clear nature of the natural resins in the varnish, creates the illusion of a thicker film with greater depth, and clarity than any sprayed lacquer, although a high gloss lacquer finish is in fact, the heavier finish. With a sprayed lacquer finish, extra "insurance coats" must be sprayed on so that when sanding back the finish, the risk of sanding through is minimized. Also, when machine buffing and polishing is to be used, the finish must be sufficiently thick for the same reason.
There is an old saying amongst violin builders regarding the varnish. It goes like this, 'not too hard, not too soft and not too thick! The reason for this is that no matter how great your varnish recipe is, a heavy film will hamper the wood's resonance.
Unlike some makes of mandolins, when I say that my finish is hand applied and hand rubbed, I mean it in the truest sense of the term, because for me, achieving the best, most resonant sound, is my absolute, number one raison d'être.
Hand Polishing the Finish
.
Until next time, thanks for reading.
Oliver
.
.
.
May 8, 2018
First, let me apologize for missing last month's blog post all together and for being a little late on this month's as well. In my defense, I did stipulate in describing my blog, that it will be "more or less monthly" and it is titled "Oliver's Random Musings". As everyone knows, life can get busier than one had planned on. One of the things that made me busier than usual will be the topic of this month's blog.
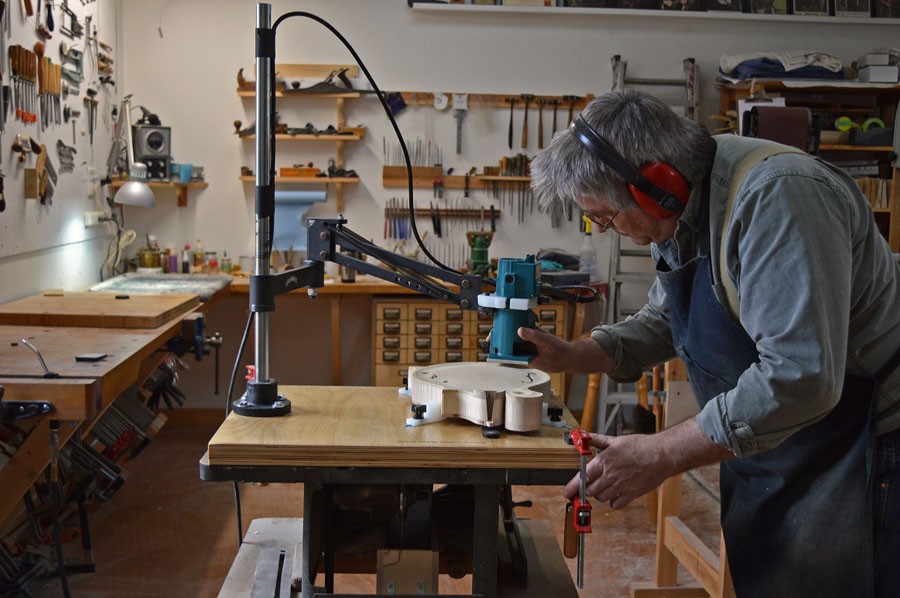
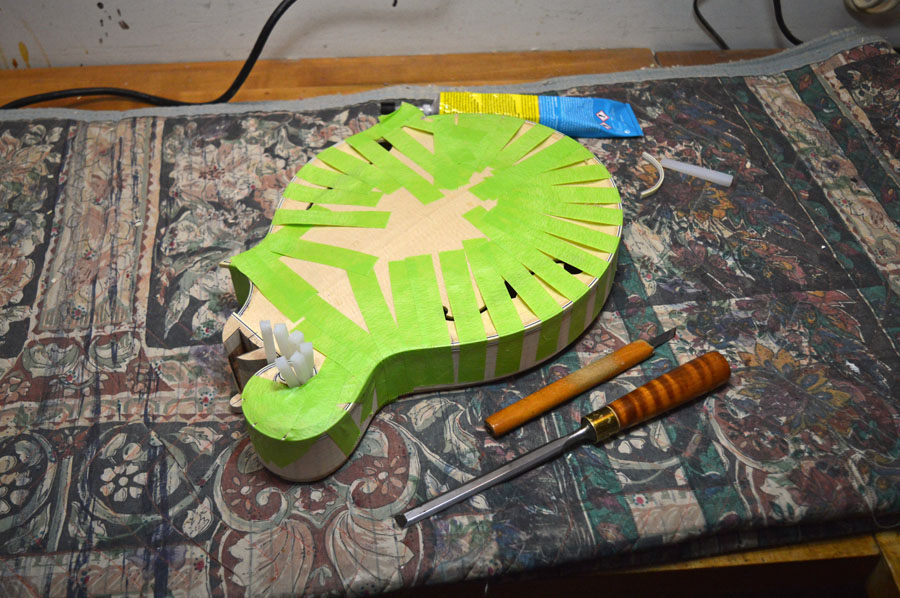
Over my 40 plus years of instrument making, I have tried a number of ways to rout the binding channel or "rabbet" around the perimeter of an instrument. Until now, none of them were completely satisfying to me. At first glance, this may seem a simple matter of running a router around the edge of the instrument. The problem is that on arched top instruments (and the backs of flat-top guitars) there is not a nice flat and square to the side, surface for the router to register on. Just running a router around the perimeter would create an out-of-square ledge for the binding to fit into. So when I got my latest idea, which I like to claim was inspired by the famous "Canadarm" on the U.S. space shuttle, I just had to take some time away from building mandolins to build this new gizmo to rout binding channels.
In case you don't know what the "Canadarm" is, it's that long arm-like manipulating crane that you see in use on the American space shuttle. It was developed by "The Canadian Space Agency" (yes, Canada has a "space agency") in co-operation with NASA. Here it is in operation.
.
Granted, my version is a little less sophisticated but to me it's just as awe inspiring.
The actual idea for my "Apiti-arm" came from one of those articulated task lights that are so useful for a number professions. You know, the kind of light that you can position any number of ways while the actual light fixture stays perfectly vertical. The key being that the light on the end of the arm stays perfectly vertical as the arm is swung around to any desired location. Now I've had this idea floating around in my head for some time now but I could never find an easy enough way to build and arm that would be capable of holding the weight of a small router until finally I came across a ready made articulating arm of the perfect size in a surplus store. What a score!
Now, I did need to make some modifications to it so that I could mount a laminate trimmer to it and I also needed to make a base that the arm could be mounted to as well as a holding mechanism for the mandolin but when it was finished, it worked like a dream! It well exceeded my expectations. Below is a photo of it in action. (In the distant, far left, you can see the light that inspired it.)
.
.
With this set-up, I can reach into almost all of the twists and turns of an F-model mandolin except into the scroll area. In this area, the ledge must still be cut by a combination of free-hand routing and a variety of hand tools. I really enjoy the challenge to my skills that this brings. It literally takes me hours to carefully cut the scroll's binding ledge and get the lines just right. Here's a look at the nearly completed scroll binding channel.......
.
.
and here's a look at the binding being glued into place.
.
.
Bye the way, the mandolin pictured above is being custom made for a special client. At this time, I'm not at liberty to say more but I hope to give a full report in the not so distant future.
As always, thanks for reading,
Oliver
.
.
.
.
.
March 8, 2018
I'm a little late with this month's blog post. I've been busy (busier than usual) creating content for my new Instagram account.
Last week my wife Jody came to me and said, "you should be on Instagram". "Insta what?" "Instagram. You need to be working the social media like a regular person". I responded that between all of the other hats that I need to wear, I already have difficulty in getting enough actual shop time. She said that if I create the content, ie; photos, that she would do the posting and otherwise manage the account and so the Apitius Mandolins Instagram page was launched!
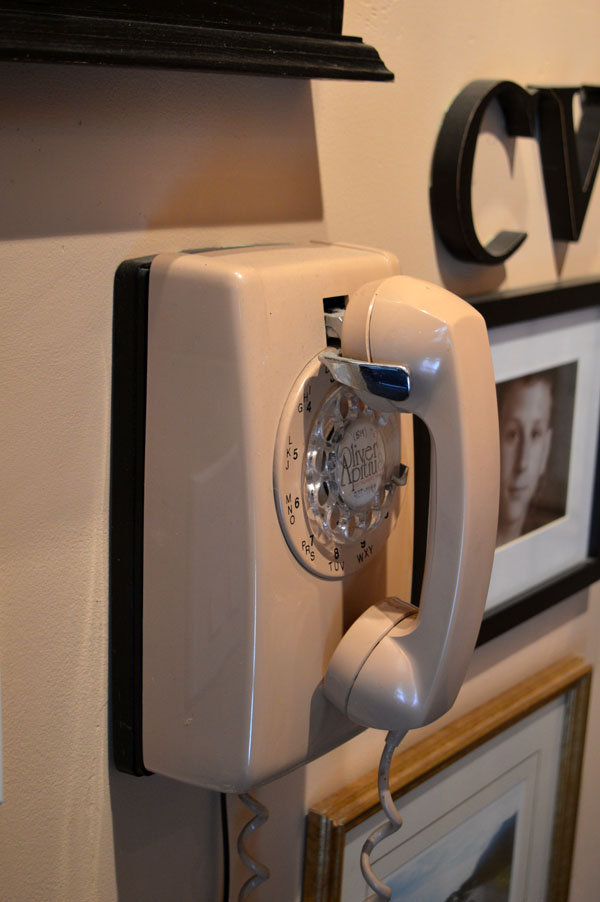
This is a giant step for a guy like me. I don't even have one of those hand held thingys that does everything and tells everyone. I still have the same wall mounted rotary telephone that I've had since, well, I'm not sure exactly. I don't recall not having it. It's worked without fail, even after a lightning strike on the cable that comes into my house. Why would I need to replace it? It's perfectly fine. See.
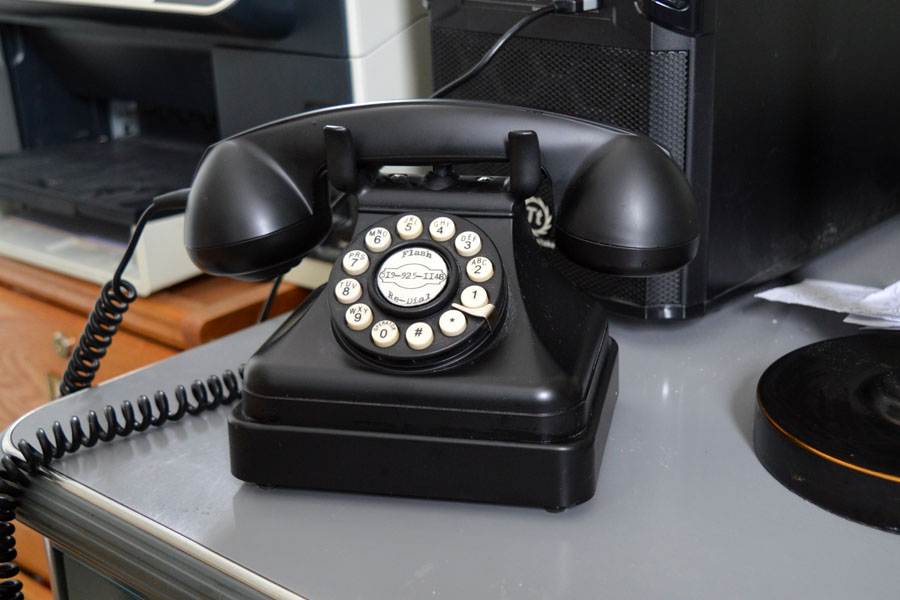
I will admit that some years ago, I had to add a "touch-tone" phone, the kind with the push button technology, in order to be able to deal with some businesses and the government people. So here's what I have in my office.
Luckily for me, Jody, remember Jody, Jody's my wife and "bestie", Jody's got one of those cellular phones. Turns out, you can't even post to Instagram with an "old fashioned computer" like mine. So, I'm slowly being dragged into the twenty-first century, kicking and screaming. I guess I'm just an old fashioned guy with old fashioned values whose lucky enough to have a guide into the "new normal".
.
.
February 1, 2018
A well made string nut with accurately spaced string slots that are also filed to a depth which provides the lowest action possible is one of the pillars of a professional set-up. I can see no reason to have an action height at the nut, that is any higher than necessary to prevent string buzz. Some players may prefer to raise the bridge up a little more than necessary to prevent buzzing just because they like the feel of (as Bill Monroe would say) a "manly" action. Personally, I like a low action at both ends of the string. How low you can go will depend on three factors, how well the frets are dressed, the string guages used and the individual player's attack. A player who strikes the strings aggressively will require a taller bridge height in order to avoid buzzing than someone with a lighter touch. String height at the nut should be the same or slightly higher than the height of the first fret whether you play hard or soft. Excess string height, especially at the nut will make fretting a note more difficult than it need be and even worse, it can cause intonation issues as the string needs to be excessively stretched to make good contact with the fret, thus raising its pitch.
Good string to string spacing as well as good spacing between the courses also contributes to a good overall set-up. Although I have heard other schools of thought on this, I contend that the gaps between the four courses should all be equal as well as the gaps between the string pairs themselves. To achieve this requires some tedious but basic math to layout the slot locations on the nut. Simply using a divider to lay-out the centers of the string pairs equidistant will not do. This would result in less of a gap between the courses of the heavier strings than the lighter ones due to their varying diameters.
In order that I did not have to do the tedious math every time I needed a different nut width and/or string guages, I came up with an Excel© spread sheet that would do the calculations for me just by entering the known and desired variables. I have included a working version of this nut slot spacing calculator below.
To use the calculator, double click on any of the buff colored boxes and enter the value you would like. The white boxes will be automatically re-calibrated when you "off click" in a blank area of the web page. The calculator is presently filled out with metric values but you can use decimal inch values as long as all of the values in the buff boxes are changed to decimal inch. In other words, all of the values in the buff colored boxes must be in the same unit of measure.
.
.
.
.
Once I have the measurements that I want for the nut slot locations, I enter them into a special Illustrator© file and print off a very accurate template.
Thanks for reading,
Oliver
.
.
January 5, 2018
Happy New Year everyone!
On top of the holidays being very busy, I came down with a nasty cough/cold/flu that I just couldn't seem to shake. After 4 weeks I was still under the weather and losing productivity in the shop and so I finally saw my doctor who seems to have whatever it was on the run now. I am presently well behind schedule in my mandolin making and I'm grateful for my customer's patients and understanding. I apologize to my readers for re-posting this blog from July 9, 2016. I just could not find the time to create an original post this month. I consider the following to be one of the most important of all my blog posts and I think it's worth re-reading.
.
July 9, 2016
In today's blog, I'm going to do my best to demystify the relation of wood to humidity. I'll start by describing what we mean by terms like humidity and relative humidity. Humidity is a term for the amount of bound water molecules in the air. If you measured the amount of water in a defined volume of air, say a cubic meter, without regard to temperature, that would be the absolute humidity. (usually expressed as grains per cubic meter) In the real world, what is important is the relative humidity and not the absolute humidity. Relative humidity refers to the amount of water molecules that can be bound in the air at a given temperature.
The warmer air gets, the more water it can absorb. Relative humidity means, the amount of actual water in the air relative to the maximum amount of water that the air could hold at that temperature. So for example, if we have a volume of air with an amount of bound water in it that is equal to 50% of how much water the air could hold at that temperature, it is said to be at 50% relative humidity or, commonly abbreviated to, 50%RH.
Now, if we take that same volume of air and heat it up, it now has the ability to carry more grains of water but if the absolute amount of bound water remains the same, then the relative humidity will drop because it now has less than 50% of the water that it potentially can hold. This is exactly what happens in the winter months. The outside air is cold and say, at 50% relative humidity then we heat it up with our central heating and unless we are adding moisture to the inside air, the inside air drops in relative humidity. It is not uncommon for heated homes and apartments to get down to 15%RH (worse than desert conditions) if humidity is not added to the inside air.
Now here's how this relates to your wooden instrument. Wood, all wood, is hygroscopic which is a fancy term for saying that it picks up or releases water depending on the relative humidity of its surroundings. If the relative humidity stays steady at a given amount then eventually the wood will reach an equilibrium moisture content (EMC) with its environs. The exact moisture content (MC) of wood in equilibrium with a given RH will vary somewhat from species to species. The various spruces used in making stringed instrument soundboards will generally have an actual moisture content by weight of 7% when in equilibrium with a relative humidity of 37-40%RH. Problems arise because as wood takes on water it actually increases in size and as it gives up water or MC, it actually shrinks. This is a property of wood and remains a property of the wood as long as the wood is still wood. We cannot change that. What we can do is learn how to deal with that fact.
Imagine a spruce mandolin soundboard being glued to a rim in an environment of 40%RH. The soundboard is measured at say 250mm across at its widest point. Now the instrument is completed and is sold to a customer who takes it home in the winter time to his heated home. If that home is not being humidified and has gotten down to say 15%RH the soundboard will now start to release moisture which will then cause the soundboard to shrink. Going from the 40%RH at which it was built to 15%RH in a heated home will cause an actual shrinkage of the soundboard in excess of 1 full millimeter. The problem is, the rim does not change in diameter, in any significant way, which means that the shrinking soundboard, which is glued to the rim, feels itself under tension and somethings 'gotta give. Either a crack develops in the wood to relieve the stress or a seam lets go.
In the summer, when the humidity goes up beyond the 40%RH that the instrument was glued together in, the wood swells in size. This time, though the rim is holding things in place, the soundboard does have somewhere to go. It can bulge up causing the string action to rise. Although the soundboard does have some room to maneuver, there is a limit and if the RH gets too high, the stress caused by the expanding wood will typically lead to seams letting go. Since high humidity is very often associated with high temperatures, these conditions will also weaken glue joints while putting the stress of the expanding wood on them. In actual numbers, a spruce mandolin soundboard that was glued up at 40%RH will grow by nearly 3mm when at an equilibrium with an environment of 80%RH
The key to avoiding problems caused by excesses and extremes of humidity is to keep your instrument from being exposed to these extremes. Solutions for excessive dryness include using a whole home humidifier on your furnace, using a room sized humidifier in the room where you store your instrument or using a humidifying device in a case in which you store your instrument. My preference is in using a whole home humidifier. It requires the least amount of ongoing maintenance and is good for the human occupants of the home as well. A room size humidifier can do a good job if correctly sized and maintained. Using a device in your case is my last choice. I find that these require a lot of maintenance and monitoring. It is difficult to insure that your are adding the right amount of moisture and not overdoing it.
Here comes one of my real pet peeves and that is that the typical hygrometers you buy at the hardware store are very often very badly calibrated. It's OK for me, I have sling psychrometers to calibrate my hygrometers because it is my business to maintain proper humidity levels but it is not so good for the average person. Proper calibration of your hygrometer is essential in maintaining proper humidity levels in your home. Other wise you could be lead to believe that you are maintaining the the proper level, which by the way is 40 - 50%RH, when in fact you are not. I wish I had a good answer for this. Here in the Toronto area, I know of one music store, The Twelfth Fret, that will calibrate your hygrometer for free if you bring it in. Maybe there are other reputable shops in your area that will do the same for you.
So the main takeaway is, keep your instrument at a comfortable humidity level, avoid extremes and you will be able to pass it along to your grandchildren in perfect working order.
Here is a handy chart that I drew up. It plots the equilibrium moisture content of a typical spruce species vs relative humidity and also shows the actual dimensional change that occurs across a 250mm wide mandolin soundboard. Keep in mind that the maples used for the back actually have a larger coefficient of expansion than the spruce top. This is even more so in rift-cut and slab-cut backs which are popular for their figure.
Click on the image below for a PDF version sized for printing on 8.5 X 11 paper.
Thanks for reading,
Oliver
© 2018 Apitius Mandolins
All Rights Reserved
.
.


 1200 X 918 June 2016.jpg)